Output to 3D Mesh
The Output to 3D Mesh is a QC tool with which you can create the geomechanical properties based on the settings of the geomechanical modeling workflow. These properties are for QC purposes only and not used as input to the simulation deck. The properties to be used in the simulation deck are generated in the Assign Data step in the Abaqus workflow.
If you have assigned a function to a material parameter (with the Material Properties form), you can assign a property to the variable(s) in your function on the Output to 3D Mesh form.
- At the top of the form, select the Geomechanical model of interest. All models that you have created with the Geomechanics workflow are available for selection.
- Select a 3D mesh from the 3D mesh drop-down list.
- From the Generate output drop-down list, select:
- On elements - the property values will be stored on element centers of your 3D mesh (storage type = 'element' in the Property Inspector).
- On nodes - the property values will be stored on the nodes of your 3D mesh (storage type = 'node' in the Property Inspector).
- Abaqus - the property values will be stored on the storage type applicable to Abaqus for your 3D Mesh (with all Abaqus input being defined on nodes, this means a storage type = 'node' in the Property Inspector).
- FLAC3D - the property values will be stored in the storage type applicable for each property to FLAC3D on your 3D Mesh. Most properties will be of storage type ‘element’, some (like Pressure) on storage type ‘node’.
- In the Property folder name text field, enter the name of the folder that will hold the geomechanical properties. The folder will appear under the Properties item of the 3D mesh you selected in step 2. The default name is the name of the input geomechanical model.
-
If the selected geomechanical model uses functions to calculate material parameters, the form displays a table listing these parameters per VOI. For each variable that is used in a function, assign an existing property in the Property column. From the drop-down list, you can select a property that has the required property type and is available for the selected 3D mesh. Properties from another geomechanical model mapped to the same 3D mesh can also be used.
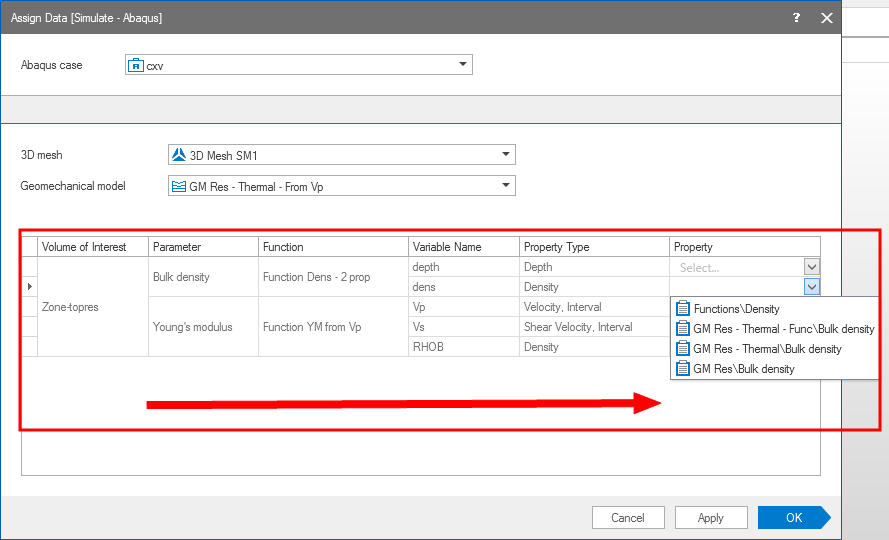

Read the table from left to right. Only the last column, Property, is editable and used to assign existing properties for function variables. click to enlarge
- Click Apply to create the properties and keep the form open, or click OK to create the property model and close the form. The settings on the form are not saved, but you can use the audit trail (home > Audit Trail > Open) to review the last used settings.
The properties are added to the folder as defined under step 4 and which will be located under 3D Meshes > your 3D Mesh > Properties in the JewelExplorer (see image below).
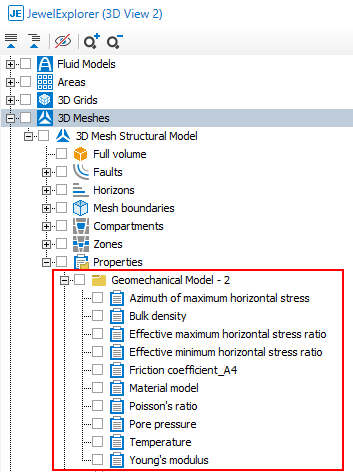
Properties generated with the Output to 3D Mesh form. click to enlarge
When you use a function that depends on Depth and want to create the property on 'Elements' (selection option in step 3) you manually need to select Element Center Depth from the context menu of the 3D Mesh (3D Mesh > Properties > Default Geometry Properties > Element Center Depth).